Set up Instant Replay on Stream Buddy
Updated on 1 Aug 2026 · 5 min read
Someone hits an insane clutch — you press one button on your Stream Deck, and OBS replays the last 30 seconds with a cinematic transition and a REPLAY overlay on top. That's what we're building. It takes about ten minutes, and we've included the transition and overlay videos for free so it looks pro from day one.
Before you start: the Replay button is pressed from Stream Buddy, so you need the SupportKori Bridge extension connected to OBS first. New to it? Follow Set up Stream Buddy with the SupportKori Bridge extension and come back — it takes five minutes.
1. Enable the Replay Buffer
The Replay Buffer is OBS's short-term memory: it silently keeps the last few seconds of your stream in RAM, ready to be saved as a clip the moment you ask for it.
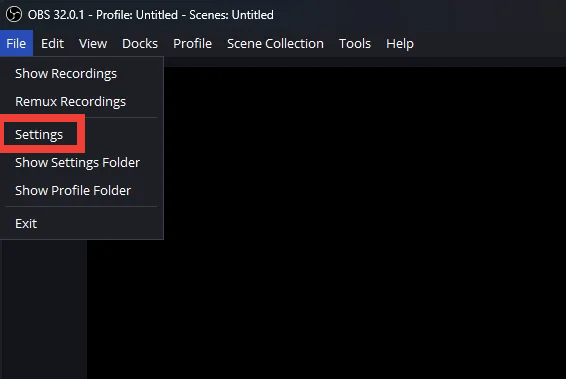
- Open OBS and click File → Settings.
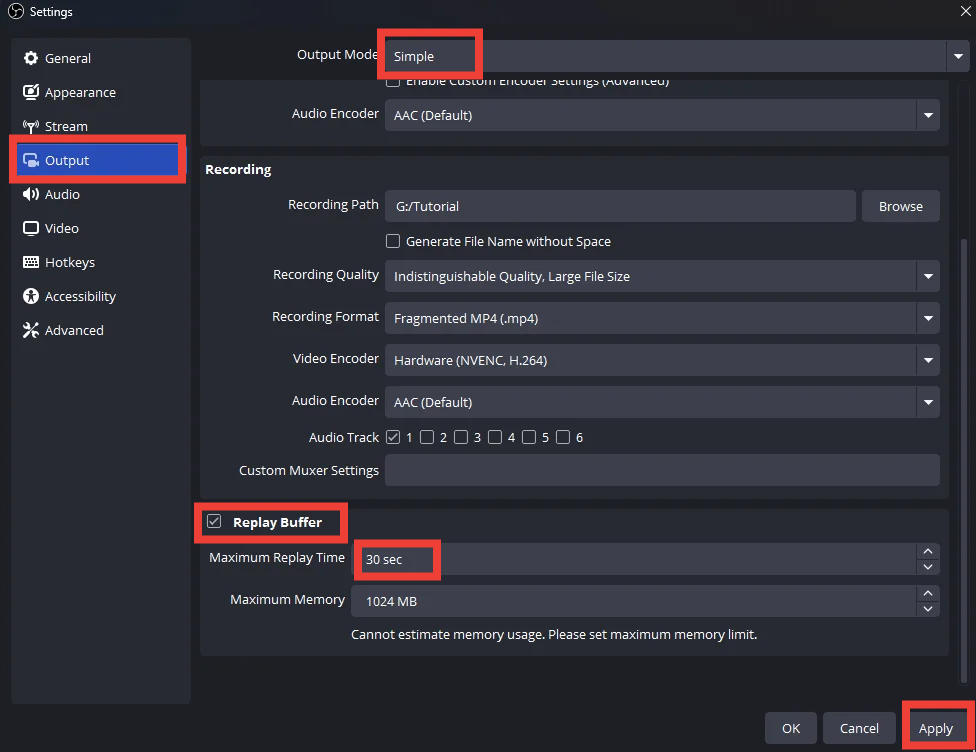
- Go to the Output tab.
- If your Output Mode is "Simple": scroll down to the Replay Buffer section. If it's "Advanced": click the Replay Buffer tab at the top.
- Tick Replay Buffer to enable it.
- Set Maximum Replay Time to 30 sec, then click Apply.
2. Start it automatically
The buffer only records while it's running — and forgetting to start it means no replays that stream. Set OBS to start it for you every time you go live:
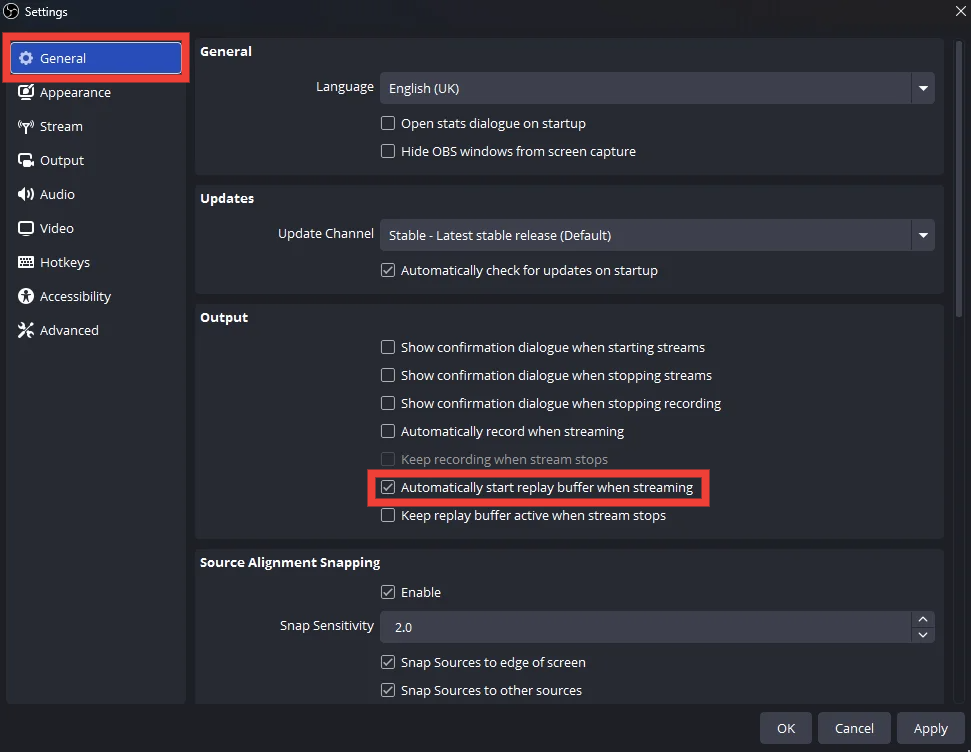
- Still in Settings, go to the General tab.
- Scroll down to the Output section.
- Tick Automatically start replay buffer when streaming and click OK.
3. Download the replay pack
These two videos are what make your replay look like a TV broadcast instead of a raw clip. Download both and save them somewhere you won't delete — OBS loads them from that location every stream.
4. Build your Replay scene
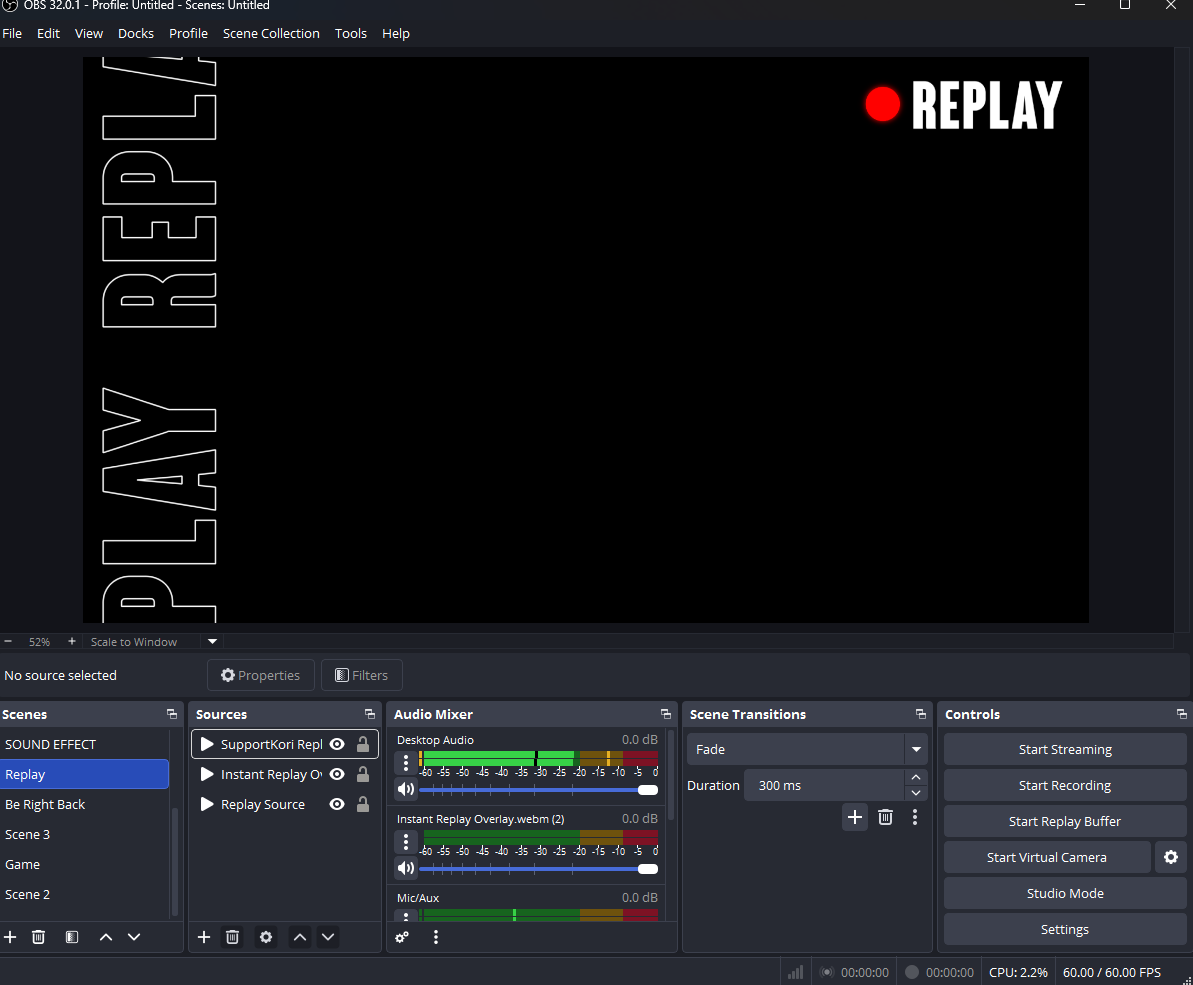
This is the scene your stream jumps to when a replay plays. It has three sources — the replay clip itself, the REPLAY overlay on top of it, and the transition that plays over everything.
First, the replay clip source:
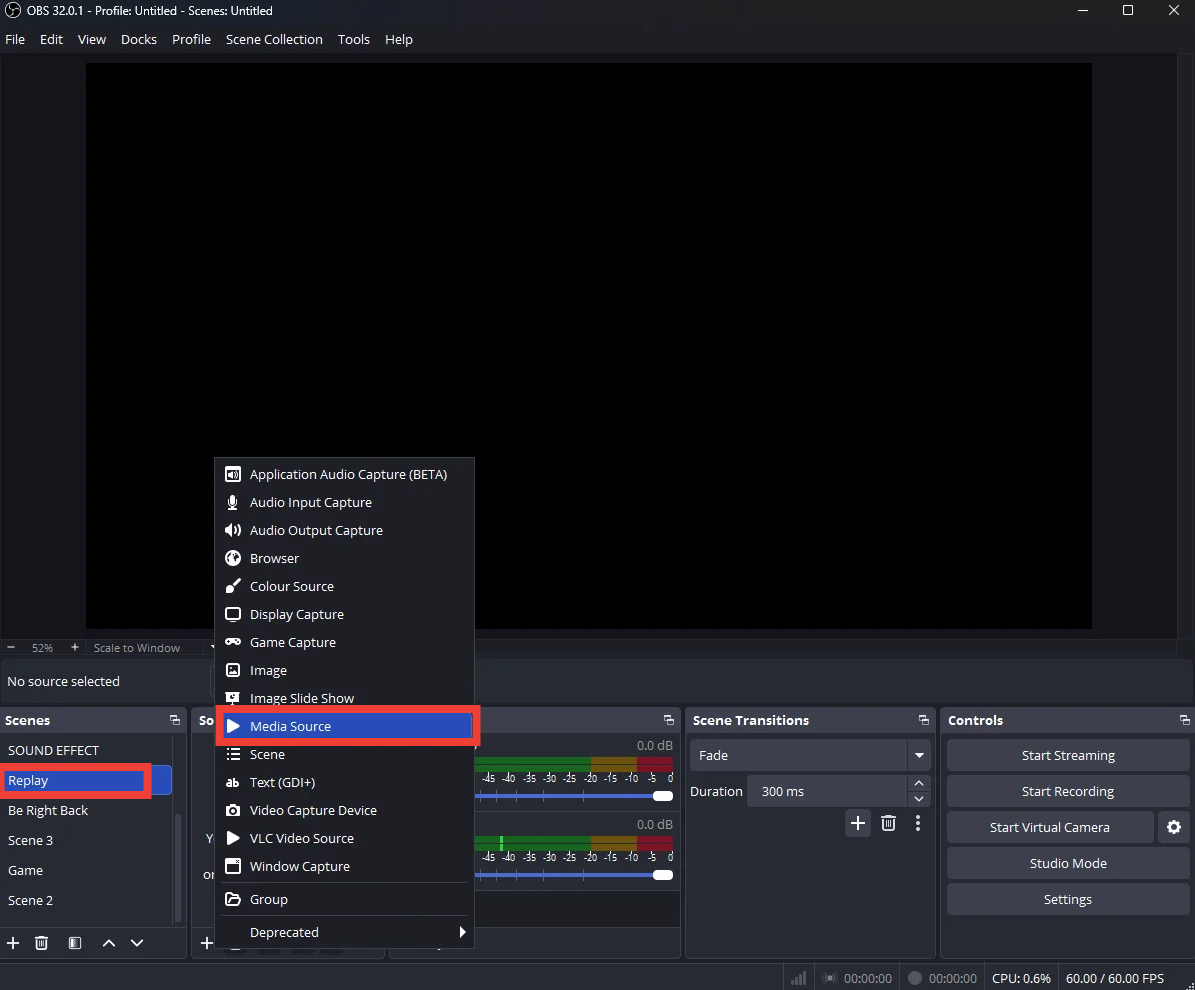
- In Scenes, click + and create a scene named Instant Replay.
- With that scene selected, click + under Sources and add a Media Source. Name it Replay Source.
- In its properties:
- Untick "Local File" — a script will feed it the clip automatically.
- Tick "Restart playback when source becomes active".
- Tick "Show nothing when playback ends".
- Click OK.
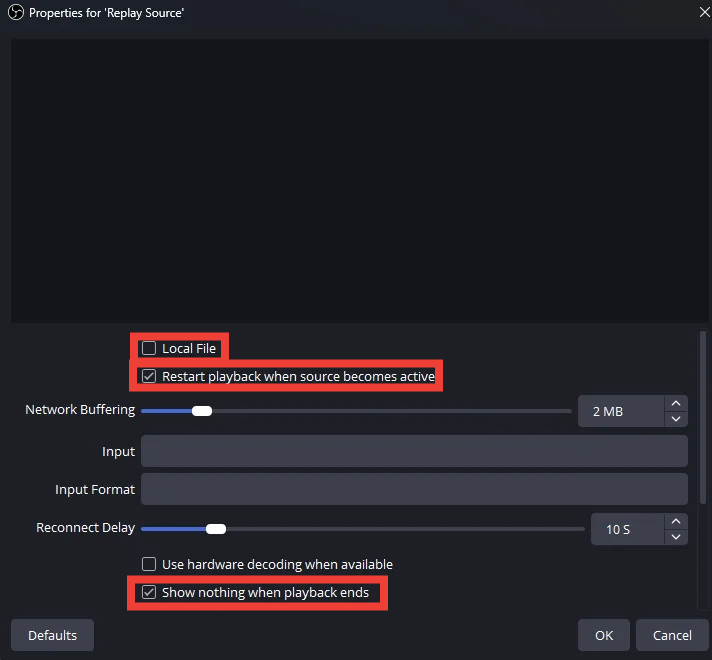
Now the two videos you downloaded:
- Add another Media Source, name it Replay Transition, and pick the downloaded SupportKori Replay Transition.webm as its Local File. Tick "Restart playback when source becomes active" and "Show nothing when playback ends" — it plays once when the scene loads, then gets out of the way.
- Add one more Media Source, name it Instant Replay Overlay, pick Instant Replay Overlay.webm as its Local File, and tick Loop. Keep it centered so the REPLAY badge frames your clip.
- Check the order in the Sources list — it matters:
- Replay Transition — on top
- Instant Replay Overlay — in the middle, under the transition
- Replay Source — at the bottom
5. Turn on the replay script
Every saved replay gets a new filename, so a normal media source can't find it. OBS ships with a hidden Lua script that solves exactly this — it catches each new replay and plays it in your Replay Source automatically.
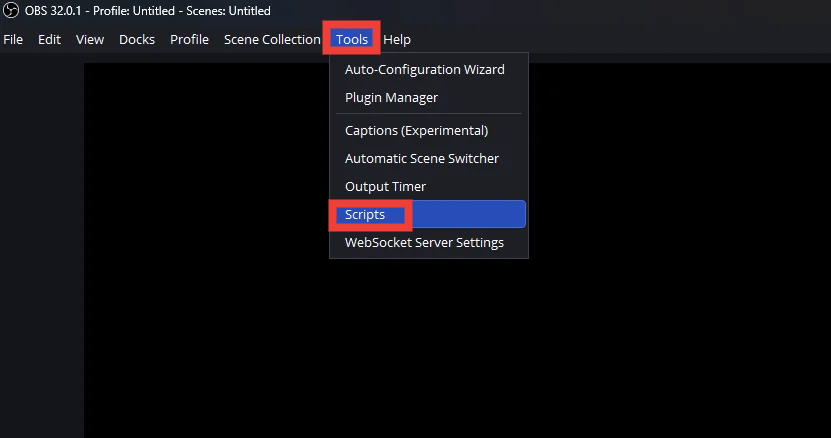
- In the top menu bar, click Tools → Scripts.
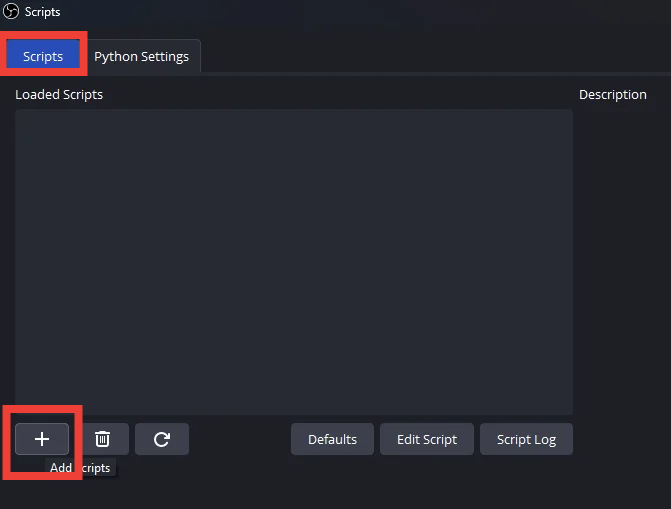
- Click the + (Add) button in the bottom left.
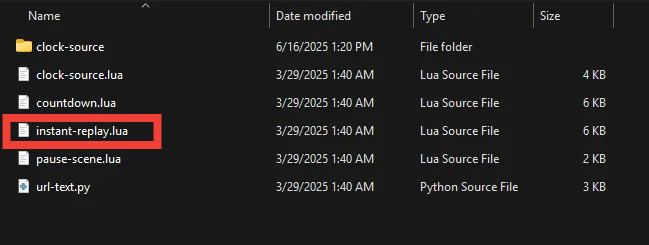
- The default OBS scripts folder opens. Select instant-replay.lua and click Open.
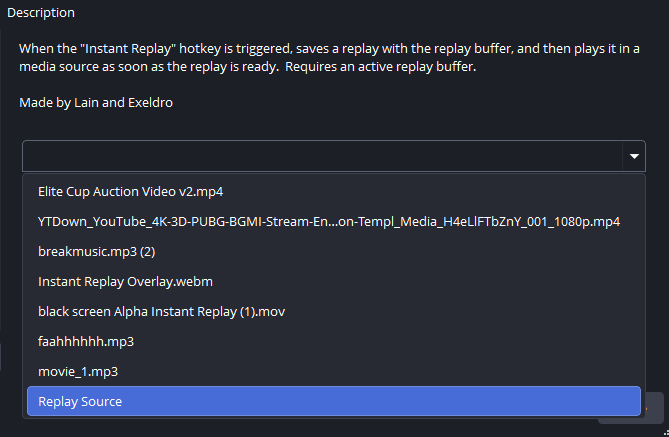
- With the script selected, look at the right side of the window — set the Media Source dropdown to your Replay Source.
- Close the Scripts window. Done.
6. Add a Replay button to your deck
Last step — wire it all to one button in Stream Buddy:
- Open Stream Buddy in your dashboard and go to the Stream Deck tab.
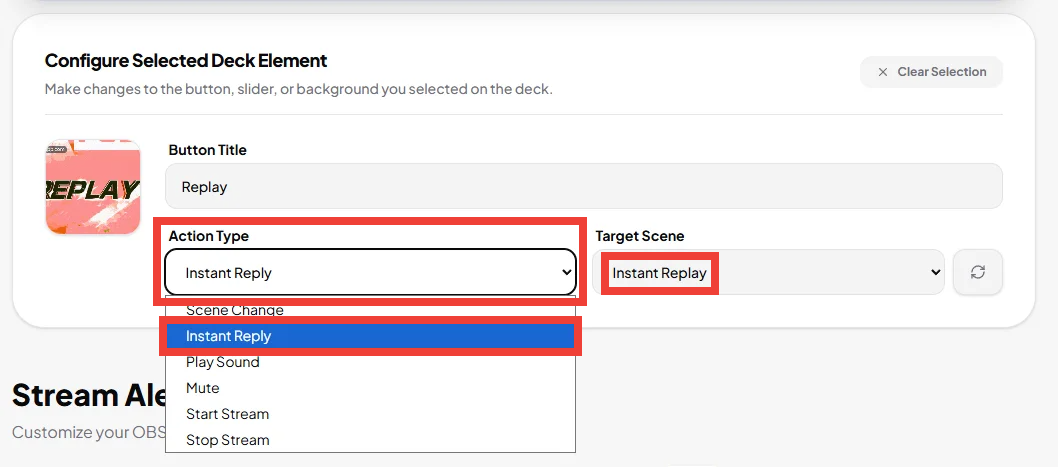
- Select a button on the deck and give it a title like Replay.
- Set Action Type to Instant Reply.
- Set Target Scene to your Instant Replay scene (hit the refresh icon if the list is empty — the Bridge must be connected).
- Save the deck.
That's it. Next time something wild happens on stream, smash the Replay button — Stream Buddy saves the last 30 seconds, switches to your Instant Replay scene, and the transition, overlay and clip all fire automatically. When the replay ends, switch back to your game scene and keep going.
Replay not playing? Check these first:
- The Replay Buffer must be running — with Step 2 done, it starts with your stream. Testing while offline? Click Start Replay Buffer in OBS Controls manually.
- The Bridge extension must be connected to OBS (green Connected state).
- In the Scripts window, make sure instant-replay.lua still points to Replay Source.
- A black Replay scene is normal when idle — "Show nothing when playback ends" hides the clip until the next replay.
- If you moved or renamed the downloaded videos, re-select them in their Media Source properties.
Did this article help you set up?